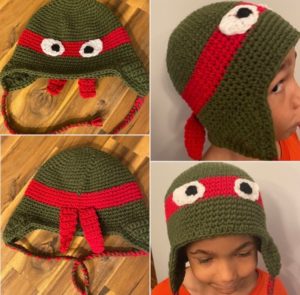

This crochet ninja turtle hat pattern is a a beginner friendly pattern that is available for free below by scrolling down on this page (there are ad’s throughout) or you can go ahead and click the red button here for the pdf version available for purchase through my etsy shop. There will be a video tutorial available soon….
Above amazon links are the materials needed for this pattern. Feel free to click any of them to order right off amazon and have shipped to your door. The list of what you’ll need is:
- 5mm crochet hook
- bernat super value yarn (green & then whatever colour you want for the headband/face mask) the headband/facemask needs to be either red, blue, purple or orange
- stitch marker, yarn needle & measuring tape
PATTERN:
Terms Used:
- ch = chain
- sc = single crochet
- sl.st = slip stitch
- fl.sc = front loop single crochet
- bl.sc = back loop single crochet
- sc.dec = single crochet decrease
Size Notes: Size: standard child size; for other sizing see the size chart found in the main menu. Scroll down for the free pattern!!
- starting with green yarn: magic ring, ch.1, sc 5 times into the magic ring, pull closed & close with sl.st & ch.1
- sc twice into each stitch around, close with sl.st & ch.1 (10)
- sc twice into the first stitch, sc once into the next stitch; continue alternating all the way around, close with sl.st & ch.1 (15)
- sc twice into the first stitch, sc once into each of the next 2 stitches; continue alternating all the way around, close with sl.st & ch.1 (20)
- sc twice into the first stitch, sc once into each of the next 3 stitches; continue alternating all the way around, close with sl.st & ch.1 (25)
- sc twice into the first stitch, sc once into each of the next 4 stitches; continue alternating all the way around, close with sl.st & ch.1 (30)
- sc twice into the first stitch, sc once into each of the next 5 stitches; continue alternating all the way around, close with sl.st & ch.1 (35)
- sc twice into the first stitch, sc once into each of the next 6 stitches; continue alternating all the way around, close with sl.st & ch.1 (40)
- sc twice into the first stitch, sc once into each of the next 7 stitches; continue alternating all the way around, close with sl.st & ch.1 (45)
- sc twice into the first stitch, sc once into each of the next 8 stitches; continue alternating all the way around, close with sl.st & ch.1 (50)
- sc twice into the first stitch, sc once into each of the next 9 stitches; continue alternating all the way around, close with sl.st & ch.1 (55)
- sc twice into the first stitch, sc once into each of the next 10 stitches; continue alternating all the way around, close with sl.st & ch.1 (60)
- sc twice into the first stitch, sc once into each of the next 11 stitches; continue alternating all the way around, close with sl.st & ch.1 (65)
- sc once into each stitch around, close with sl.st & ch.1
- repeat last round 2 more times
- switch to headband colour yarn (I used red but you can also use orange, blue or purple)
- sc once into each stitch all the way around, close with sl.st & ch.1
- repeat last round 4 more times
- ch.1, fl.sc once into each of the first 4 stitches, ch.1 & turn work
- sc once into each of those same 4 stitches, ch.1, turn work
- repeat last row 10 more times & fasten off
- re-attach red yarn at the ch.1 of the seam & ch.1
- work 1 fl.sc int each of the last 4 stitches from the last round worked, ch.1 & turn work
- sc once into each of those same 4 stitches, ch.1, turn work
- repeat last row 10 more times and fasten off
- switch back to green yarn, attaching it at the seam & ch.1
- bl.sc once into each of the first 4 stitches
- sc once into each of the remaining stitches of the round except for the last 4 where you will work 1 bl.sc into each of those last 4, close round with sl.st & ch.1
- sc once into each stitch around, slose with sl.st & ch.1
- repeat last round 3 more times & fasten off
Ear Flaps:
- re-attach yarn in the 12th stitch from the back seam & ch.1
- sc once into that same stitch & then once into each of the following 10 stitches, ch.1 & turn work
- sc once into each of those same 11 stitches, ch.1 & turn work
- sc once into all 11 stitches again, ch.1 & turn work
- sc.dec, sc once into each of the next 7 stitches, sc.dec, ch.1 & turn work
- sc once into each stitch (9), ch.1 & turn work
- sc.dec, sc once into each of the next 5 stitches, sc.dec, ch.1 & turn work
- Sc.dec, sc once into each of the next 3 stitches, sc.dec, ch.1 & turn work
- Sc.dec, sc once into each of the next stitch, sc.dec, ch.1 & turn work
- Sc.dec, sc once into the next stitch, fasten off
- Fold work in half to line up with the other side & repeat these steps for the other ear flap
- DO NOT FASTEN OFF THE SECOND EAR FLAP
- Ch.1, sc evenly all the way around, close with sl.st & ch.1
- Hdc all the way around, slose with sl.st & fasten off
- Cut even lengths of yarn (green & whatever colour you used for the headband) 3 strips of each colour for each ear flap
- Pull through the bottom of the earflap half way so that it’s folding over the stitch to secure in place and then separate them into even strips & braid
- Tie off bottoms
Eyes:
- Using your white yarn: ch.7
- Dc into the 3rd ch.from hook, dc into each of the next 3 stitches
- Add 3 dc’s into the last chain, as you add these dc’s your work will begin to rotate, work 1 dc into each of the next 3 ch’s going back down the other side of the chain
- Sl.st into the last chain, ch.1 and fasten off
- Using your black yarn, magic ring & ch.1
- Sc 3 times into the magic ring, pull closed & close with sl.st into the ch.1 space
- Fasten off
- Use a yarn needle to sew the white part of the eyeball onto the hat right on the headband/facemask
- Use your yarn needle to sew the black part of the eyeball onto the white part of the eye
- Repeat these steps for the other eye
- Use your yarn needle to hide and secure all of your tail ends