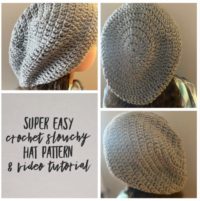
Here is another hat pattern for you, this one is a convertible design as it can be worn as both a fitted beanie or a slouchy hat!!
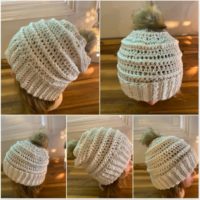
Oh yes, it’s about that time!! Crochet hat patterns will be pumped out on repeat for the next few months so keep an eye out. Those of you who participate in vendor events or online sales or simply looking for gift ideas this year, I hope you will find a variety of patterns here on my website. Please keep in mind there are a number of different ways you can get my patterns. Many of them are offered completely free via video tutorial and/or written here on the website (with ad’s throughout; hey, I gotta get paid somehow right?!) …. if you prefer to have a printable pdf version of my written patterns however, I have been offering them on my etsy shop as well. Something new I am starting recently is also offering the links to amazon pages that offer the exact products I use for my patterns so that you can shop for them right from the comfort of your home and in most cases, receive them the very next day. Of course I am always up for suggestions on how to better offer you an experience to keep you coming back so if you would ever like to share your feedback with me you can definitely do so through instagram direct message or etsy direct message!! For now, here is a look at the new hat pattern fresh off the hook!!
Click this red button for the printable pdf version or scroll down for the freebie (video tutorial coming soon)![]()
Materials Used In This Pattern
- Bernat Premium or Bernat Super Value yarn (1 skein)
- 5mm crochet hook
- scissors, measuring tape & yarn needle
- pompom
Note: click any of the amazon tabs below to order the materials needed and have delivered right to your door!! Once you are all set and have your materials good to go, scroll down to see the pattern!!
Terms Used In This Pattern:
• Ch = chain
• Sc = single crochet
• Hdc = half double crochet
• Fp.hdc = front post half double crochet
• Bp.hdc = back post half double crochet
• Sl.st = slip stitch
• y/o = yarn over
• p/u = pull up
• Hdc.dec = half double crochet decrease
Size Details: Please note that this pattern is incredibly easy to accommodate for
any size. I offer prompts on when to take measurements if you’re working on a
hat other than a woman’s medium. The stitch count, along with the same yarn
and hook size that I suggest above in the materials needed section, will yield a
woman’s medium. If you would like to make any other size, just simply follow the
prompts throughout the pattern on when to take measurements and you may
reference the size chart (click here to open in another window) to see what the
measurements should be for the size you wish to make.
Pattern:
• Ch.11
• Sc once into the second chain from the hook and each chain down the row
(10 stitches) ch.1 & turn work
• bl.sc into each stitch all the way down, ch.1 & turn work
• Repeat last row 65 more times or until you reach the desired head
circumference measurement desired (see measurement prompt below)
MEASUREMENT PROMPT: Right now you are working on the band of the hat. Please
reference the size chart to see what head circumference you need depending on the hat size you
wish to make. I will remind you of the importance to make your measurement less 2” to
account for the stretch of the yarn. For a ladies medium you should have a measurement of 20”
since we wish to accomplish a hat fitting a head circumference of 22”
• Fold work in half lining up the short ends and close seam with slip stitches
& ch.1
• Your work is currently inside out, flip around so it’s not inside out anymore
• Hdc evenly all the way around, your stitches should match up with the
number of rows you’ve worked in the band, so in my case it’s 65, close
round with a sl.st in the ch.1 space from the start of the round, ch.1
• Hdc once into each stitch around, close with sl.st & ch.1
• Bp.hdc all the way around, close with sl.st & ch.1 • Hdc into each stitch all the way around, close with sl.st & ch.1 • Repeat last round again
• Repeat * to * 4 more times or until the desired hat height (less 1”)
• Hdc.dec, hdc once into each of the next 3 stitches …. continue all the way
around working an hdc.dec & then 1 hdc into each of the following 3
stitches, close round with sl.st & ch.1
• Hdc.dec, hdc once into the following stitch …. continue alternating all the
way around, close with sl.st & ch.1
• Bp.hdc all the way around, close with sl.st & ch.1
• Hdc.dec, hdc once into the following stitch …. continue alternating all the
way aorund, close with sl.st & ch.1
• Repeat last round again
• Fasten off with a long tail end
• Use yarn needle to weave the tail end in and out of the stitches all the way
around, then pull like a drawstring to close the opening at the opt of the
hat.
• Attach pompom and push tail end into the hat to secure, hide and fasten
of