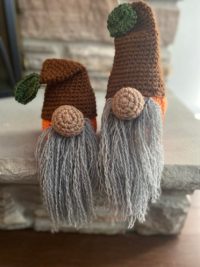
Free Crochet Gnome Pattern (2 sizes)
The excitement in my house from my little ones when they saw these gnomes on the mantel was so heartwarming!! These 2 crochet pumpkin gnomes are a perfect way to kick off your fall décor. No matter what your favorite part of the season is; changing colors of the leaves, pumpkins, Halloween, thanksgiving … this gnome will pull that all together with the pumpkin body, autumn colors & the little leaf hat topper. You will be able to make 2 different size gnomes or, like me, both!!
This pattern is available in 2 ways (video tutorial coming soon). You can have this pattern as a written freebie (below with ad’s throughout) or you can get the printable pdf version off my Etsy shop (click here).
Size details: little one sits 7” & tall one site 9” (from bottom to tip of hat)
scroll down for the free pattern
Materials Needed:
- Yarn (bernat super value): orange, black, grey, green & whatever color you want to use for the nose
- 4.5mm hook
- Fiber fill
- Scissors, yarn needle & stitch markers
Terms Used:
- ch = chain
- hdc = half double crochet
- sl.st = slip stitch
- bl.hdc = front post half double crochet
- sc = single crochet
- Sc.dec = single crochet decrease
**NOTE** if you are unfamiliar with any of the stitches used in this pattern, you can check out the stitch tutorials “how to” section in the main menu above where I break down each stitch individually in a stitch focused tutorial for these and many other commonly used as well as unique stitches.
Pattern:
PUMPKIN BODY:
- Using orange yarn, ch.20 for small or 35 for tall
- Hdc once into the 2nd ch from the hook & each ch down the row, ch.1 & turn work (19 or 34 stitches)
- Bl.hdc into each stitch, ch.1 & turn work
- Repeat last row 19 more times
- Fold work in half lining up the long ends to connect, using sl.st, you will connect the long ends together all the way down
- Fasten off with long tail end & use tail end to weave in and out of the stitches around the opening at one end; pull closed like a drawstring and secure
- Your work is inside out, flip around so it’s no longer inside out,
- Stuff with fiber fill & then using your yarn needle, weave a long piece of orange yarn in and out of all the stitches around the opening, pull closed like a drawstring, secure and snip remainder of tail end – tuck little pieces into the pumpkin with the yarn needle
NOSE:
- Magic ring, ch.1, sc 5 times into the magic ring, close with sl.st & ch.1
- Sc twice into each stitch around, close with sl.st & ch.1 (10)
- Sc twice into the first stitch, sc once into the following stitch …. continue all the way around, close with sl.st & ch.1 (15)
- Sc once into each stitch around, close with sl.st & ch.1
- Repeat last round 2 more times
- Sc.dec, sc once into next stitch …. continue all the way around, close with sl.st & ch.1
- Stuff nose with fiber fill or any stuffing of your choice
- Sc.dec, sc once into next stitch …. continue all the way around
- Close with sl.st & ch.1
- Fasten off with long tail end
- Sew hole shut and use long tail end to attach to the body
HAT (using brown yarn):
- Ch.35, attach last chain to the first chain with a sl.st & ch.1
- Sc once into each chain around, close with sl.st & ch.1
- Sc into each stitch around, close with sl.st & ch.1
- Repeat last round 4 more times
- Sc.dec, sc once into the next stitch …. continue all the way around, close with sl.st & ch.1 (23)
- Sc into each stitch all the way around, close with sl.st & ch.1
- Repeat last round 3 more times
- Sc.dec, sc once into the next 9 stitches, sc.dec, sc once into the next 10 stitches, close with sl.st & ch.1
- Cut a piece of yarn from the other end of your yarn ball/skein, the same color as you’re using right now for the hat; thread your yarn needle with it and sew the hat to the head of your gnome pulling the last bit of yarn into the inside of the hat. Secure it by knotting it and then fill the hat with fiber fill to this point so far, then continue on with finishing the hat
- Sc.dec, sc once into each of the next 5 stitches …. continue all the way around, close with sl.st & ch.1
- Sc once into each stitch around, close with sl.st & ch.1
- Repeat last round 4 more times
- Sc.dec, sc once into each of the next 2 stitches, continue around, close with sl.st & ch.1
- Sc once into each of the first 3 stitches, sc.dec …. continue all the way around, close with sl.st & ch.1
- Sc.dec, sc once into each of the next 3 stitches, sc.dec, sc once into each of the remaining stitches, close with sl.st & ch.1
- Sc.dec all the way around, close with sl.st
- Fasten off with long tail end, use yarn needle to close the hole at top of the hat and hide tail end
LEAF:
- Ch.7
- Dc twice into the 2nd ch from hook & into each of the next 3 stitches
- Dc once into the next stitch
- Sc once into the last stitch
- Turning your work back down the other side of the staring chain, dc once into the next chain
- Dc twice into each of the following 4 stitches
- Close with sl.st into the tip of the leaf & fasten off with a long tail end
- Use yarn needle to thread the long tail end down stitches of the back, middle of your leaf to meet with the other tail end from your starting loop & fasten to the tip of the hat, tie and secure, use yarn needle to hide tail ends & fasten off any loose ends sticking out
BEARD:
- Cut even strips of grey twice the length of what you want the beard to be
- Feed strips, one by one, through stitches on the face halfway/folding the strip in half so that you can tie them in knots attaching to the face
- Once you have secured all of the strips to the face of your gnome you will pull apart the pieces of yarn by splitting and pulling upwards & apart to unravel