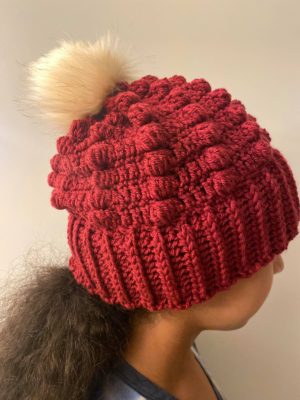
Crochet Bobble Beanie Pattern 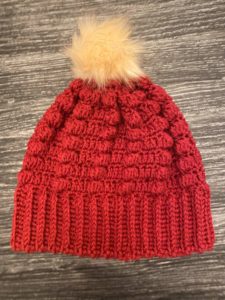
FULL PROJECT VIDEO TUTORIAL BELOW!!!!
This crochet bobble beanie pattern is a super comfy, warm and beautifully textured hat…. does that tick all the boxes for a perfect cold weather accessory?! Here is the pattern for you available in 3 different ways. Free written pattern right here on this page (with ad’s throughout) or Free via video tutorial (scroll down and press play) if you prefer the printable pdf written pattern you can download it for a small fee off my etsy shop by clicking the red button below.

PATTERN:
Size: pattern stitch count gives adult medium size; for other sizes, please see the size chart (click here to open it in another page)
Materials Needed:
• 5mm crochet hook
• Yarn needle, scissors
• Patons Canadiana Yarn (net wt: 100g/3.5oz) 1 skein
To order these materials directly off Amazon and have them ship right to your door: click here!!
Terms Used:
• ch = chain
• st = stitch
• sts = stitches
• sl.st = slip stitch
• y/o = yarn over
• sc = single crochet
• dc = double crochet
• dc.dec = double crochet decrease
• hdc = half double crochet
• fp.hdc = front post half double crochet
LETS GET STARTED ON THE PATTERN:
• Ch.15, hdc in 2nd ch from hook and each ch down the row (14)
• * ch.1 and turn your work, hdc into the first stitch, skip the first post and
fp.hdc around the next post, fp.hdc all the way down, hdc into the last
stitch (14 sts)*
• Repeat * to * for 60 rows total or (or 21”)
NOTE: right now you’re working on the band of the hat. This hat based on the
yarn I’m using and the hook size, my stitch count will yield a size adult medium
hat. If you would like to use the size chart for measurement, have a look at the
hat size chart to see the head circumference measurement needed. Be mindful of the stretch that will naturally
happen with a crochet hat and make your band 1” less than the measurement on
the size chart.
• Fold your work in half, lining up both ends to form the brim of the hat
• Close a seam with slip stitches all the way down working through the stitches of
both ends connecting them together
• Your work is now inside out, flip around so that the seam is on the inside,
ch.1
ROUND 1:
• Sc evenly all the way around, close with sl.st and ch.1 (60)
ROUND2:
• [ ch.2, dc into each of the first 4sts
• Work bobble stitch: y/o, push hook through stitch, y/o and pull up a loop,
y/o and pull through first 2 loops on hook; repeat this 5 times all in the
same stitch – you should now have 6 loops on your hook, y/o and pull
through all 6 loops on your hook
• Ch.1
• Dc into each of the next 4 sts
• Work bobble stitch: y/o, push hook through stitch, y/o and pull up a loop,
y/o and pull through first 2 loops on hook; repeat this 5 times all in the
same stitch – you should now have 6 loops on your hook, y/o and pull
through all 6 loops on your hook
• Ch.1
• Keep alternating between bobble stitches and dc’s al the way around
• Close with sl.st in the top of the ch.2 space from beginning of round
ROUND 3:
• Ch.1, sc into each st around, close with sl.st in the ch.1 space from
beginning of round ]
ROUND 4-13:
• Repeat [to]
ROUND 14:
• Your last round should have been sc all the way around
• Ch.2
• Dc.dec twice, bobble stitch …. repeat all the way around, close with sl.st in
the top of the ch.2 space from beginning of round
ROUND 15:
• Ch.1, sc all the way around
• Close with sl.st in the ch.1 space from beginning of round
ROUND 16:
• Ch.2, dc into each of the first 2 sts
• Work bobble stitch: y/o, push hook through stitch, y/o and pull up a loop,
y/o and pull through first 2 loops on hook; repeat this 5 times all in same
stitch, you should now have 6 loops on your hook, y/o and pull through hall
6 loops on your hook
• Ch.1
• Dc into each of the next 2 sts
• Work bobble stitch: y/o, push hook through stitch, y/o and pull up a loop,
y/o and pull through first 2 loops on hook; repeat this 5 times all in same
stitch, you should now have 6 loops on your hook, y/o and pull through hall
6 loops on your hook
• Ch.1
• Keep alternating between bobble stitches and dc’s all the way around
• Close with sl.st in the top of the ch.2 space from beginning of round
ROUND 17:
• Ch.1 and sc all the way around, close with sl.st in the ch.1 space from the
beginning of the round
FINISHING:
• Fasten off with a long tail end; long enough to weave in and out of the sts
all the way around the hat, pull the tail end fully through once you’ve
fastened it off
• Weave the tail end in and out of every other stitch al lthe way around and
pull closed like a draw string to close the top of the hat and use the tail end
to attach the pompom to the top of the hat
FULL PATTERN VIDEO TUTORIAL: